well hop on over to here.
All day workshop 31st August.
You can spend a fantastic day with, Ali from Ali-craft as well as Heidi and Jane.
They are both fellow design team members who are going to teach you some different styles and techniques it will be a blast, I only wish I were going as well, maybe next time.
Happy crafting
Barbara
Monday, 22 July 2013
Sunday, 14 July 2013
Quietfire designs meets Spellbinders............
Hi there,
I hope you are all enjoying the beautiful weather we are having at the moment, long may it last.
As I was looking through my creations the other day, I came across this card I had made a while ago.
I came across this style of card on the internet, fell in love but could not find any instructions, after a while of playing and a bit of wasted card, I cracked it!
I used Spellbinders Labels 4 grand so it is not a small card LOL. The background roses are a set by Stampin Up and the verse is by Quietfire designs, I love these stamps. I only have a couple but as funds allow I will be getting some more.
I may add to this card yet as I feel as though it is lacking something, maybe a florish or some 3d flowers.
I hope you all enjoy the rest of the day.
Happy Crafting
Barbara.
I hope you are all enjoying the beautiful weather we are having at the moment, long may it last.
As I was looking through my creations the other day, I came across this card I had made a while ago.
Sorry for the poor picture |
I came across this style of card on the internet, fell in love but could not find any instructions, after a while of playing and a bit of wasted card, I cracked it!
I used Spellbinders Labels 4 grand so it is not a small card LOL. The background roses are a set by Stampin Up and the verse is by Quietfire designs, I love these stamps. I only have a couple but as funds allow I will be getting some more.
I may add to this card yet as I feel as though it is lacking something, maybe a florish or some 3d flowers.
I hope you all enjoy the rest of the day.
Happy Crafting
Barbara.
Monday, 8 July 2013
I've been playing again................
With the delightful Doo Lally Pip stamps by Lindsay mason.
For this months Ali-Craft design Team creation, I have chosen to use this stamp set, it is called Time Travel.
Here is my completed card for you.
Now if you would like to recreate this card, here is a list of what I used.
Doo Lally Pip Clear stamps "Time Travel"
Cream Card
Brown Card
Kraft Card
Distress Paints in the following colours Antique Linen, Walnut Stain and Broken China.
Archival Ink in Coffee
Prima 6 x 6 "Engraver" paper Pad
Glossy Accents
Prisma Pencils and Gamsol (Odourless Mineral Spirits)
Take your cream card and trim it to 4.5 x 5.5 inches.
With the Antique Linen Distress Paint, give the card a generous coat and let it dry, you can give it a blast with a heat gun to speed the process up. once this has dried grab your broken china distress paint, and gently swipe the paint top over your card, ensuring not to press too hard as we are looking for a random look! if you find you have put too much on, don't panic, grab a wet wipe and clean the paint off and try again.
Now the final colour the Walnut Stain, yes I know it is dark colour but with a gentle swipe it is not so in your face IYKWIM, I gave a couple of swipes on the main body of my card, then I went for the corners, if you notice my corners are more smoother looking. How did I achieve that I hear you ask. All I did, was to rub the paint into the surface after I had applied it, this smoothed out those drag marks and blended it in more.
For the image, I stamped it onto Kraft coloured card and a second image onto a piece of patterned paper from the Prima Engraver pad. I then coloured his Hair, Hat and Trousers using my Pencils and Gamsol, then I fussy cut him out and his Coat from the patterned paper.
On your painted piece of card stock, I stamped the Watch image using Archival ink in coffee. Randomly all over, then heat set it to dry the ink.
Stamp the verse onto scrap Kraft card in the coffee ink and cut out each word.
Now time to assemble.
Adhere your main image onto your Painted and Stamped card front, then adhere his coat as well, place the cut out words where you would like them to be stuck, when you are happy with the placement, stick them down, I used glossy accents, as this gives a bit of wiggling room!
As a final touch I stamped the screw heads along the bottom and covered them in Glossy Accents, I also added a bit to his glasses and watch on top of his hat. this is then ready to mount onto a card blank.
I hope you like this card, if you have any questions, please feel free to contact me.
Happy Crafting
Barbara
For this months Ali-Craft design Team creation, I have chosen to use this stamp set, it is called Time Travel.
Time Travel |
Here is my completed card for you.
Love the glossy Accents. |
Now if you would like to recreate this card, here is a list of what I used.
Doo Lally Pip Clear stamps "Time Travel"
Cream Card
Brown Card
Kraft Card
Distress Paints in the following colours Antique Linen, Walnut Stain and Broken China.
Archival Ink in Coffee
Prima 6 x 6 "Engraver" paper Pad
Glossy Accents
Prisma Pencils and Gamsol (Odourless Mineral Spirits)
Take your cream card and trim it to 4.5 x 5.5 inches.
With the Antique Linen Distress Paint, give the card a generous coat and let it dry, you can give it a blast with a heat gun to speed the process up. once this has dried grab your broken china distress paint, and gently swipe the paint top over your card, ensuring not to press too hard as we are looking for a random look! if you find you have put too much on, don't panic, grab a wet wipe and clean the paint off and try again.
Now the final colour the Walnut Stain, yes I know it is dark colour but with a gentle swipe it is not so in your face IYKWIM, I gave a couple of swipes on the main body of my card, then I went for the corners, if you notice my corners are more smoother looking. How did I achieve that I hear you ask. All I did, was to rub the paint into the surface after I had applied it, this smoothed out those drag marks and blended it in more.
For the image, I stamped it onto Kraft coloured card and a second image onto a piece of patterned paper from the Prima Engraver pad. I then coloured his Hair, Hat and Trousers using my Pencils and Gamsol, then I fussy cut him out and his Coat from the patterned paper.
On your painted piece of card stock, I stamped the Watch image using Archival ink in coffee. Randomly all over, then heat set it to dry the ink.
Stamp the verse onto scrap Kraft card in the coffee ink and cut out each word.
Now time to assemble.
Adhere your main image onto your Painted and Stamped card front, then adhere his coat as well, place the cut out words where you would like them to be stuck, when you are happy with the placement, stick them down, I used glossy accents, as this gives a bit of wiggling room!
As a final touch I stamped the screw heads along the bottom and covered them in Glossy Accents, I also added a bit to his glasses and watch on top of his hat. this is then ready to mount onto a card blank.
I hope you like this card, if you have any questions, please feel free to contact me.
Happy Crafting
Barbara
Monday, 1 July 2013
Challenge accepted..............
Well the Gauntlet was thrown down to the DT of Ali Craft to include Butterflies on our July challenge project.
So after a few days mulling the possibilities, I went ahead and created this Tag.
Butterfly Tag |
I tried a new technique with this tag with this challenge. I followed Tammy Tutterow's tutorial on how to use Tim Holtz's Frosted film in a different way. I really love this technique, it is difficult to see on my picture, the tag has become translucent while the pattern from the paper is still there.
Please go to Tammy's Blog, to follow the tutorial. She has some great ideas on her blog, I just wish I had a smigen of her talent!
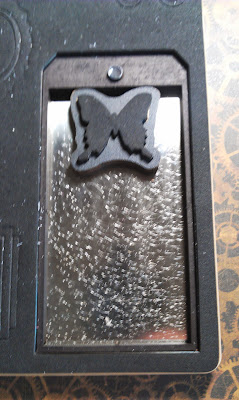
Now once I had made my base for my tag, I took a piece of Acetate (Tammy used Shrink Plastic, sadly I don't own any) and Die cut a Tag using Tim Holtz's Tag Die. I then took a Movers and Shapers Butterfly and placed it inside the Tag Die and placed my Frosted film base on top and ran it through my Big Shot.
Butterfly in position before Film is placed on top. |
I now had a tag, with a butterfly aperture, I also cut out a matching butterfly from a scrap piece of patterned paper for me to use later on.
I then adhered the Frosted film on to my Acetate Tag, then to give the tag some texture. I ran it though my Big Shot in a embossing folder. This also helps the Film stick to the Acetate a lot better.
See the Texture |
Using Victorian Velvet and Vintage Photo Distress inks I edged my Tag and then took my favourite product of all times Treasure Gold, just love this stuff! You can see in the photo above how I added some Classic along the edge of my Tag.
With the additional butterfly I cut out from some Scrap patterned paper, I ran this through my Big Shot in an embossing folder, highlighted the edges with Treasure Gold and Vintage Photo Distress Ink. Then using a strong Glue I adhered it to the Apeture at the top of my tag. Then added a Pen nib for the body of the butterfly.
Add caption |
I then decided to add some lace to my tag, I took some wide lace (from my stash) and dyed it using Distress Stains In Antique Linen and Victorian Velvet, then I spritzed it with water for the colours to mute and merge slightly. Then I gave it a blast with my Heat Gun.
Coloured Lace |
I stamped Life Moments inside the frame, from the stamp set by Tim Holtz called simple sayings, cut this out and covered it in Crackle accents.
I glued the lace to the bottom of my tag about half an inch up, then I added a string of flat Back Pearls in Ivory (from my Stash). Once they had dried I adhered some Pre-Made paper roses and a couple of Branches ( Martha Stewart Punch from my stash) .
I also added some Seam binding that I had dyed using Tattered Rose Distress stain through the hole at the top of my tag. As the final touch I adhered the saying on top of the lace.
I do hope you liked my entry for July's Challenge. Most of the products mentioned are available from Ali Crafts. If you cannot see what you are looking for, please give Ali a call.
Please join in on the Challenge, show Ali and the Design Team what you can make with our challenge. Just go to Ali Craft Blog after the 6th July. This gives you lots of time to be creative and post your Project.
Happy Crafting
Barbara
Subscribe to:
Posts (Atom)