Saturday 20 April 2013

Boxing clever......................

Hi there,

I hope everybody is enjoying this beautiful weather we are having at the moment, I really hope it lasts!

Any way I thought I would show you what I have been creating in my Hut over the last week, yes it took me that long, I kept procrastinating about which papers to use. I tend to hoard my papers than use them, as they are so pretty.

As the title suggests, I have made a box, but not an ordinary gift box, as when you lift the lid off there is a nice element inside.


Here it is..............


Now for a close up of the flowers....


I hope you can see the sparkle on the  flowers, I used the Distress Stickles Glitter in Clear Rock Candy and to adhere it to the flowers, I used my Glue Gloss Pen.

The patterned paper is an oldie by Basic Grey called Capella.


I made the flowers with MFT Die-namics Royal Rose, the flourish is also by MFT, I also used the Martha Stewart Branch punch. Pearls are from Mei Flower.

The Main Panel on the front of the Box is made using Spellbinders Majestic Squares, then stamped with Happy Birthday by Just Rite and embossed with Silver embossing powder by WOW


Here is a shot of the side of the box...


I used a die by Memory Box, but I think it has been discontinued :(


Now for the inside...................


 I just love the inside, it adds an extra special element to it. I may add some corner Dies to the four outer corners as I am not to keen on them being so plain.

I hope you enjoyed looking at my latest project.


Happy Crafting


Barbara xx


Sunday 14 April 2013

Welcome to the UKS Blog Hop


 Hi there,


Welcome to the UKS Spring BlogHop! You may have come to me from    


http://efemera-ink.blogspot.co.uk


If you lose your way, or have dropped in on me directly and want to follow the hop, you can see the full list with all the links here.


http://www.ukscrappers.co.uk/boards/showthread.php?t=339546


My project for this Blog hop is a Cascading Card.


oops I seem to have a wonky Lamp Post!


So if you are ready, here we go..................................


You will need the following items to make this card.


Score Board
Metal Rule
Craft Knife
Pencil
DST
Dies
Die Cutting Machine
12" x 8" Card
4 1/2 x 11 1/2 (Base)


Step 1

Along the 8" edge of your Card mark at 5.5" then along bottom mark at 2.5". Now connect these marks with a pencil.

Marked and connected


Step 2

Now cut along this line. you will end up with two of  these.


Step 3

Now you will need to make two marks on both pieces.

On the 5.5" side from the bottom up mark at 2 7/8" and then on the 2.5" side from the bottom up mark at 1 1/8".

Draw a feint line linking each mark (see photo above).

Step 4

Place one piece onto your score board (5.5" to your left). Score at the following measurements. 2", 4", 8" and 10". Now along the bottom edge mark at 6" and draw a vertical line.

Repeat this with the second piece of card.


Step 5

Take one of the pieces of card and cut from the top at the following score lines 2" and 10" Do not cut all the way down, stop when you reach the pencil line in the centre.

Now along the Bottom edge where you have marked at 6" cut along that line till you reach the centre line.


Step 6

Take the second piece and cut from the Bottom edge at the following 2" and 10", then along the top edge find your 6" line and cut from the top to the centre line.

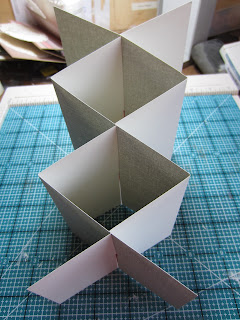
Now you have cut you slits onto both of your pieces of card you can now link them together.

First slit linked


Second slit linked


Third slit linked


 You should now have a card that looks like this


Step 7

Now to make a base for this card.

Take a piece of card ( I chose to use the same card ) that measures 4 1/4 x 11 1/2. score this on your board at 5 3/4 and fold in half.


Step 8

Adhere the cascading section to the front of the base and add your choice of decorations.

I do hope you are enjoying the Blog hop so far.

Please now hop on over to Here_be_Dragons for her Blog hop post.


http://scrapbooksandcookbooks.blogspot.co.uk/


Happy Crafting


Barbara xx

Thursday 11 April 2013

Unusual fold....................

Hi there,


Well whilst I was mooching around Pinterest, I found an unusual fold that I thought I would have a bash at.

I love the fold of the card, just not sure I like the papers I used on this card. Now don't get me wrong I love the papers, I just feel that that do not go with this card, what do you think? answers on a postcard please LOL or you can leave a comment.


Well here it is........


Now that I have time to mull over this, I think I should of Cut the Opulent Ovals in the same card as the base.


The small flower and leaves have been made using Impression Obsession Spiral Flowers and Leaf Cluster
I covered a piece of card in some copper tape, then ran the Spiral Flowers die through my Grand Calibur and rolled it up.


I will not give up on this style of card, I can feel a remake coming up................


Happy Crafting


Barbara xx


Friday 5 April 2013

Clean and Simple................

Whilst attempting to sort out my craft room of stash, affectionately known as "The Hut", I came across some Stampin up sets that I have not used for ages.................

So out came the ink pads from Stampin up as well, have not used these for a while either.

Next I brought out the Calibur and my Spellbinder dies and I made this...............................


Sometimes the simple things are best.


I used the following on my card.


Stampin Up Heartfelt Thanks (2005)
Stampin Up Rose Red dye ink
Stampin Up Always Artichoke dye ink
Spellbinders Timeless Rectangles
Adhesive Pearls


Happy Crafting

Barbara.