Monday 30 December 2013

Peace.............................

Hi there,

Just a quick post for you as I am off to bed in a minute.

The following card was from an order that a friend placed with me this Christmas. I would love to show you all of them but I forgot to take pictures of them all, I only got this one gggrrrr!


Sorry for the poor picture, it was a quick snap shot.

As you can see I have used Some spellbinders and Memory Box dies here and a Martha Stewart punch.

I embossed some Acetate to go behind the window to give an impression of glass, the Candles come from the Memory Box Die Chandelier and the small flower is a Impression Obsession die. 

If you have any questions please feel free to e-mail me via my button on my blog.

Enjoy

Barbara xx

Let's bring in the New Year........................

With Jofy set number 5....


Here is my December DT for Ali Crafts using the lovely Jofy 5 set.

Sometimes you may come across people who do not really celebrate Christmas, but do bring in the New Year. So with that in mind I set about making a card that Celebrates the New Year.

Here is the result..........................

Sorry for the trimmer in the background!
Here is a quick run down on how to make it.

8 1/4 x 81/4 Cream Card stock scored in half, Stamp the Cross Hatch image around all the edges in Archival Ink in Fern Green.

Then apply Antique Linen Distress ink around the edges.

Take a panel cream card and stamp a Text image all over in Antique Linen Distress ink and let fry, Then apply Antique linen and Brushed Corduroy.

Stamp the Tassels image three times in Black Archival ink on the panel and leave to dry. Now on some scrap cream card, take the tassel stamp and stamp in black ink and Heat emboss in WOW clear embossing powder, once set, colour in image using mica paints and leave to dry, then cut out.


You can see the dimension here.

Stamp the word bar two times so you can cut out Happy New Year, heat emboss as before. Then paint with Gold Mica paints, as the writing is raised it acts like a resist so the words are not obstructed.

Using foam pads adhere the main panel onto the card base, then add your cut out tassles and words.

Voila your card is completed.

I hope you all had a wonderful Christmas and have a very Happy New Year.


Don't forget to book your places at Ali-craft retreats and workshops, full details are available on the website.


Happy Stamping


Barbara

Monday 18 November 2013

Let's light up those dull winter evenings.........................


Hi there,

It's Barbara here with the next project for Ali-Craft.

Ali sent me a set of stamps by Jo-Firth Young called Jofy 5. They are a Christmas themed set of stamps.


JOFY Collection 05
Jofy 5

I wanted to make something other than a card this month, whilst perusing the internet, I came across a paper Lantern, The instructions were in Norwegian and the measurements were in Centimeters.

Anybody who knows me well, will remember that I only work in inches, Sorry I just cannot get into Centimeters, so I converted all the measurements into inches and used google Translate so I could understand how to put it together.

I did have to make a few adjustments here and there, it is not exactly like the one I found as I missed the cross on the windows and I also built a base for the tea light ( Battery operated) to sit into. For that I used my Silhouette Cameo, well I say mine it is actually Hubby's but I have it on long term loan LOL.


So here it is.


The Lantern.


Here are a few more pictures of my Project

The other side.


Window.
On the window I used a paper Transfer Technique, using some Patterned paper and Frosted Film. I then ran some glue around the edges and added some fine and coarse German glass glitter.

Hanging loop.


 Using a mini wooden spool, Aged mahogany Distress ink,Washi Tape, beads and some embossing powder I made a hanging loop.

Close up to see the Embossing effect.
Tea Light Platform.

My stamped images were coloured with Distress pens and then adhered straight onto the body of the Lantern.

When I find the website I found this Lantern on, I will edit this post.

I do hope you enjoyed my Project for Ali-Crafts this month.

Please pop back soon as I am working on a Tutorial for this, going to take a wee while as I have some other bits and pieces I need to do first.

Happy Crafting


Barbara xx

Tuesday 12 November 2013

November Ali Craft Challenge..................

Hi there,

This months Ali-Craft challenge is White on White.

I have to say I found this one challenge as I find white on white quite hard to do, I hope that you will enjoy my card that I made and that you will join in the fun here.


Now to show you all my creation for the challenge.....


Sorry for the fuzzy bit at the top!


So the picture above is the card in full, the card had a tag which you can either add further decoration to or just to write your greeting on.


Here are a couple of pictures of the topper, as you can see I used some Shrink Plastic to create the Heart. Whilst it was still warm I pressed a rubber stamp onto it to get the texture, then rubbed some Pearl coloured gilding wax.


Well I hope you liked it.


Happy Crafting


Barbara xx

Wednesday 16 October 2013

Jofy by jove.................


Hi there is my turn (Barbara) to showcase a product from Ali-craft as part of their design team.

I was asked to use some stamps designed by Jo-Firth Young, the set I am using is Jofy12.


Here is my project, I know it's another tag, there is a reason for this. I wanted to use a variety of mediums and I needed something that would stand up to the challenge! In this case a Chipboard tag came to my rescue.................

Here is a list of Products I used to create this tag.


Jofy plate 12
Archival ink in Jet Black
Glue and Seal in Matte
Grunge Paste
Crackle Glaze
Vintage Lace, Beach Hut and Snowflake Fresco Paints
Cut and Dry Foam
Water Colour Crayons (my stash)
Treasure Gold in Silver
Stencils
Gesso


All products I used are available from Ali-craft, with the exception of the water colour crayons.

If you cannot see the product on their website give them a call..............


Now don't go thinking that it is just a simple tag, it is not. There are a few processes I used in order to achieve the look I wanted!


Step one.

Take your Tag and slap a good coat of Gesso onto it and let dry.


Gesso going on.


Step Two.

Paint a base layer of colour, I used Beach Hut mixed with Snowflake white Fresco finish Paints by PaperArtsy.


You can see the ratio approximately here.


Step Three.

Once your base layer has dried, I gave mine a blast with my heat gun to speed the process up.
Take the Crackle glaze (I used the one by Paperartsy.) following their instructions, I scraped a thin layer onto my tag using a palette knife and let it dry.

Step Four.

Once the crackle had dried, I took a piece of Cut n Dry foam and sponged on some Vintage Lace Fresco paint, by using a sponge you get a much smaller crackle, id you were to use a paint Brush you get a more open crackle effect.

see the crackle effect here.

Step Five.

Now grab hold of any stencils you'd like to use and your favourite inks, I like to use the Distress Inks when I am using stencils. Now decorate the tag, keeping it fairly subtle as you wan the stamped images to be the main focus.

As you can see I have used a variety of stencils here.

The blue criss cros was stamped with Blue Archival ink.


Step six.

Now take some Grunge Paste, I used Paperartsy's on my tag. Using a brick stencil I scraped some paste onto my tag in the lower left hand corner. I wanted to give an impression of a ruined wall.


Once this had dried, I noticed that the paste had cracked, this was due to the crackle paste underneath, that’s what I call a happy accident !!!!

I then added some colour on top of the  paste.

Look at that crackle effect.

Step Seven.


On to some old book paper I stamped using Archival ink, the main flower from the stamp set and put aside.

I then stamped my images onto my tag, onmce again using Archival ink as I wanted to use some water colour crayons to colour the images.

From the previously stamped flowers I coloured them in using my water colour crayons and cut them out. I the adhered them onto the tag with Glue and Seal in matt


Stamped onto Tag

Image stamped onto old Book paper and coloured.
Adhered to the tag using Glue and Seal Matt
I then stamped the wording onto some old book paper and adhered to my tag using the Glue and Seal again.


Step Eight.

Once everything had dried I added a touch of Treasure Gold in silver, around the edges and some on to the Grunge Paste ruined wall.


Many thanks for looking at my project.

Happy Crafting


Barbara.


Tuesday 8 October 2013

Textured heart tag..................

Hi there,

I hope all is well in the land of craftyness.

Recently I got the chance to play with a new mask from Jennie, it is a really funky Chevron pattern and lots of fun to use.


I also got to play with the delectable paints by Paper Artsy, I am so in love with these paints, they are so smooth and have a lovely finish on them when they are dry, tons of colours too!


Here is what I created....................


I also cracked open my Melt Pot, something I have not used for a while. The flower on the Heart is a mould that I got from Jennie, but I cannot find it on her website, she may be out of stock. If you give her a call I am sure she could get you one.


If you would like a tutorial on how I created this tag, give me a yell and i will create one.


Happy Crafting


Barbara x

Saturday 5 October 2013

Ali-craft October challenge..................

Hi there,

Welcome to the Ali-craft October Blog Challenge.


Each Month Ali-craft have a challenge and this month's theme is Halloween, well it is the month of all things that go bump in the night!


Here is my Blog Challenge entry....


I had a rummage around the great room of stash AKA the HUT and came across a set of stamps by Tim Holtz, that had some halloweeny images on them.
Next I debated over the colours to use, in the end I plumped for Dusty Concord, Mustard Seed and Spiced Marmalade distress ink pads.

I used a couple of the new Stencils by Tim Holtz, these were Bubble and Honeycomb, then I stamped using Embossing ink and Black sparkly embossing powder the Spiders web, additionally I embossed the letters, which were cut using Alphabetical sizzix die in my Big Shot.


Close up to see the dimension.

I hope you liked my entry and it has inspired you to enter your creation, There will be a prize for the winner!


Happy Crafting

Barbara xx

Tuesday 1 October 2013

Pretty pink Roses...................

Hi there,

I have a card to show you today, even though it is a Sympathy card I do feel as though it can be made a a Birthday or even a Thank you card.

I used the following products to create this card.


Spellbinders "Filigree Delight"

Spell Binders Grand Rectangles

Archival ink Jet Black


Foam Pads

Score Board

Distress ink pens

Embossing Folder


It is an Easel card, I love making these type of cards as I find they display so much better.


I stamped the Roses onto the main die cut panel, then stamped another image onto the same type of card stock and coloured it in using Distress Ink Pens by Ranger.

I then fussy cut it out,decoupaged it onto the the main image using foam pads to give the dimension I wanted.


Well I must go now as I have a crafty bunch of friends coming over and I need to get ready for them.

Happy Crafting


Barbara xx

Monday 30 September 2013

Krafty Birthday....................and an addition to the family.


Hi there crafters,


I hope you are all well.

I am back after a Holiday, New Puppy, son's 18th and a passing of a loved one, It as been a hetic few weeks here in this household I can tell you.


This is the new addition to our family................ She keeps me very busy!


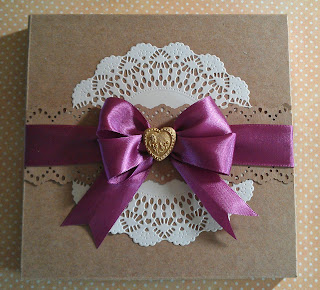
Before we went away I was asked to make a Birthday card for a friends mum, after much deliberation I have produced a Card with a matching box.


Here is the card.


I have used the following products:

Kraft coloured card from Anna Marie designs
Doily Die by Cheery Lynn
Plum Ribbon by Mei Flower
Heart Mould by Katy Sue Designs
Stamps by Justrite
Prima Patterned paper
Wow Gold embossing powder.
Martha Stewart Punch
Score Board


If you are careful you can heat emboss onto ribbon. I used the Gold WOW embossing powder on my ribbon and on the main card.


Here is the lid to the box.


I made the hearts by using Air dry Clay and the Elegant Heart mould by Katy Sue Designs.


I hope the recipient likes it.


Happy Crafting


Barbara

Monday 19 August 2013

Prima Mixed Media Doll Project by Barbara

Good Morning crafters.


It is my turn (Barbara), to share with you a blog project using the lovely stamps by Prima for the Ali-Craft Design Team.

These are a range of Art Doll stamps designed by Julie Nutting. They are suitable for using with a range of Mixed media


Today I am playing with doll number 181


Here is my Memo Board


Here is the Prima Art Doll I used.


First of all, gather your supplies.


As you can see I have used a fair few bits and pieces! 

Martha Stewart Punch
Treasure Gold in Classic
Alphabet Dies
Spiral flower Dies
Felt
Tim Holtz Frosted Film
Chip Board Scalloped Rectangle
Promarkers
Ranger Glue and Seal in Matt
Clear and Pepper Embossing Powder by WOW
Stazon ink Black
Momento in Black
Post it notes

Here is how I made it.


Step One.

Cover your chipboard Shape with patterned Paper, I used Prima paper, I adhered this using Glue and Seal in Matt by Ranger.

Step 2.

Using my Distress Paints I daubed around the edges and then used my fingers to blend the paint onto the surface. If you find you have got patches of really strong colour, you can tone it down by adding Antique linen.


Once that had dried I took my Damask stencil by Prima and Antique Linen Distress ink, I applied this in patches over the surface. I sprinkled on my Embossing powder tapped off the excess and zapped it with my Heat Gun.


I carried on using my other stencils with lighter shades of distress ink until I was happy with my background.


Brushes are available from Ali Craft


Step Three.

I stamped my Doll onto card that is suitable for promarkers and coloured her in, I then proceeded to cut her out using fine tipped scissors and a craft knife ( for the gaps between her feet and legs).


Stamp another Doll onto some patterned paper and cut out her dress.

Step Four.

I applied a piece of Frosted film to some Paper from the Prima Pad Devine and stamped directly on top with the Wings stamp. I used Stazon for this step. 

I then used the tutorial by Tammy Tutterow to transfer the pattern to the frosted film, once I had finished this step I used an sizzix embossing folder to add some dimension to her wings.


Wing Detail

Step Five.

Cut out your Spiral Flowers in Felt and assemble. Then punch some Branches from some scraps of paper. 

Step Six.

Cut out your Letters and cover with Versamark and heat emboss using Wow embossing powder in Pepper, add a touch of Treasure gold if you'd like a mottled effect.


Step Seven.

Using the Treasure Gold accent the edges, leave this for about half an hour and then buff it up to give it a real sheen.


Now we can start to put all the elements together.

Adhere your Post it notes to the bottom of your panel, making sure you have room for your doll. Add some foam pads to the back of your doll and add her wings, adhere this to the panel.

Add your letters where you'd like them to be and glue down, I just used an PVA glue in a fine tipped bottle. Next add your flowers and you are finished.


If you own one of these dolls, you could always enter our current monthly blog challenge via HERE.  Do pop on over here to get inspired by the Design Team's creations and for the challenges details and rules.  You could win a £15 voucher to spend on the website.
Please do stop by for another blog project next Monday.


I do hope you liked my project and go on to create your own, These stamps are so much fun to work with!


Barbara

Monday 22 July 2013

Want to get away and craft for a day....................

well hop on over to here.


 All day workshop 31st August.
 http://www.ali-craft.co.uk/catalog/images/logo.jpg


You can spend a fantastic day with, Ali from Ali-craft as well as Heidi and Jane.


They are both fellow design team members who are going to teach you some different styles and techniques it will be a blast, I only wish I were going as well, maybe next time.


Happy crafting


Barbara

Sunday 14 July 2013

Quietfire designs meets Spellbinders............

Hi there,

I hope you are all enjoying the beautiful weather we are having at the moment, long may it last.

As I was looking through my creations the other day, I came across this card I had made a while ago.


Sorry for the poor picture


I came across this style of card on the internet, fell in love but could not find any instructions, after a while of playing and a bit of wasted card, I cracked it!

I used Spellbinders Labels 4 grand so it is not a small card LOL. The background roses are a set by Stampin Up and the verse is by Quietfire designs, I love these stamps. I only have a couple but as funds allow I will be getting some more.

I may add to this card yet as I feel as though it is lacking something, maybe a florish or some 3d flowers.


I hope you all enjoy the rest of the day.


Happy Crafting

 Barbara.

Monday 8 July 2013

I've been playing again................

With the delightful Doo Lally Pip stamps by Lindsay mason.

For this months Ali-Craft design Team creation, I have chosen to use this stamp set, it is called Time Travel.


Time Travel


Here is my completed card for you.


Love the glossy Accents.


Now if you would like to recreate this card, here is a list of what I used.


Doo Lally Pip Clear stamps "Time Travel"
Cream Card
Brown Card
Kraft Card
Distress Paints in  the following colours Antique Linen, Walnut Stain and Broken China.
Archival Ink in Coffee
Prima 6 x 6 "Engraver" paper Pad
Glossy Accents
Prisma Pencils and Gamsol  (Odourless Mineral Spirits)

Take your cream card and trim it to 4.5 x 5.5 inches.

With the Antique Linen Distress Paint, give the card a generous coat and let it dry, you can give it a blast with a heat gun to speed the process up. once this has dried grab your broken china distress paint, and gently swipe the paint top over your card, ensuring not to press too hard as  we are looking for a random look! if you find you have put too much on, don't panic, grab a wet wipe and clean the paint off and try again.
Now the final colour the Walnut Stain, yes I know it is dark colour but with a gentle swipe it is not so in your face IYKWIM, I gave a couple of swipes on the main body of my card, then I went for the corners, if you notice my corners are more smoother looking. How did I achieve that I hear you ask. All I did, was to rub the paint into the surface after I had applied it, this smoothed out those drag marks and blended it in more.

For the image, I stamped it onto Kraft coloured card and a second image onto a piece of patterned paper from the Prima Engraver pad. I then coloured his Hair, Hat and Trousers using my Pencils and Gamsol, then I fussy cut him out and his Coat from the patterned paper.

On your painted piece of card stock, I stamped the Watch image using Archival ink in coffee. Randomly all over, then heat set it to dry the ink.

Stamp the verse onto scrap Kraft card in the coffee ink and cut out each word.

Now time to assemble.

Adhere your main image onto your Painted and Stamped card front, then adhere his coat as well, place the cut out words where you would like them to be stuck, when you are happy with the placement, stick them down, I used glossy accents, as this gives a bit of wiggling room!
As a final touch I stamped the screw heads along the bottom and covered them in Glossy Accents, I also added a bit to his glasses and watch on top of his hat. this is then ready to mount onto a card blank.


I hope you like this card, if you have any questions, please feel free to contact me.

Happy Crafting


Barbara